

Mardi Himal Trek


Trip Duration
10 days DaysGroup Sizes
2-10 PeopleTransportation
Tourist Bus / Private Vehicle / Flight (Optional)Destination
Mardi Himal TrekMax. Altitude
4500Best Season
Oct-Dec,Mar-MayActivities
- Trekking
- Scenic viewpoint visits
Difficulty
EasyMeals
- Breakfast
- Lunch
- Dinner
Start & End Point
KathmanduAccommodation
- Teahouse
- Lodge
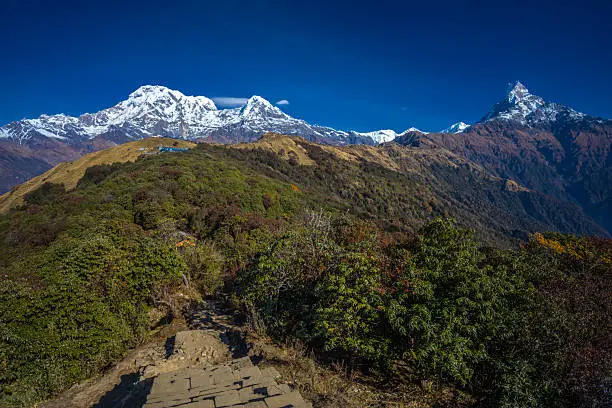
Overview of Mardi Himal Trek
 |
 |
A Complete Guide from Kathmandu to the Ridge Above the Clouds
Why Mardi Himal Feels Different
There is something about the Mardi Himal trek that the bigger, more famous trails in Nepal simply cannot replicate. You are still in the Annapurna region, still surrounded by the same jaw-dropping wall of eight-thousanders that has drawn trekkers from every corner of the world for decades. But here, the ridge belongs mostly to you.
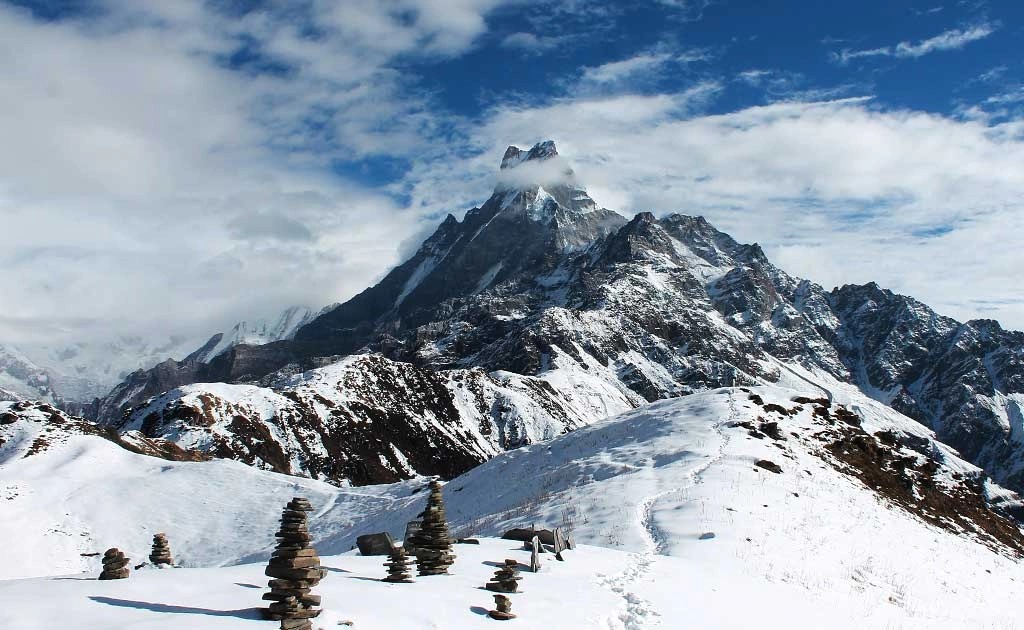
Mardi Himal sits quietly east of the Annapurna massif, its long forested ridge climbing through rhododendron and oak before breaking out above the treeline into a world of raw stone, Himalayan wind, and uninterrupted views that stretch from Dhaulagiri to Manaslu. The trail was only officially opened to trekkers in 2012, which means it has not yet found its way into the standard package-tour circuit. Most days on this route, you will share the path with far more Himalayan griffons than you will with other trekkers.
This guide covers everything you need to know before you take the first step out of your Kathmandu guesthouse and everything that happens until you land back in the Tribhuvan International Airport with sore legs, a camera full of photographs you will spend months trying to adequately explain to people who were not there, and a very real desire to come back.
Trek at a Glance
| Category | Details |
|---|---|
| Trek Name | Mardi Himal Trek |
| Region | Annapurna Conservation Area, Gandaki Province, Nepal |
| Start Point | Kathmandu, Nepal (with drive or flight to Pokhara) |
| End Point | Pokhara, then return to Kathmandu |
| Total Duration | 10 days (including travel days from and back to Kathmandu) |
| Trekking Days | 6 active trekking days |
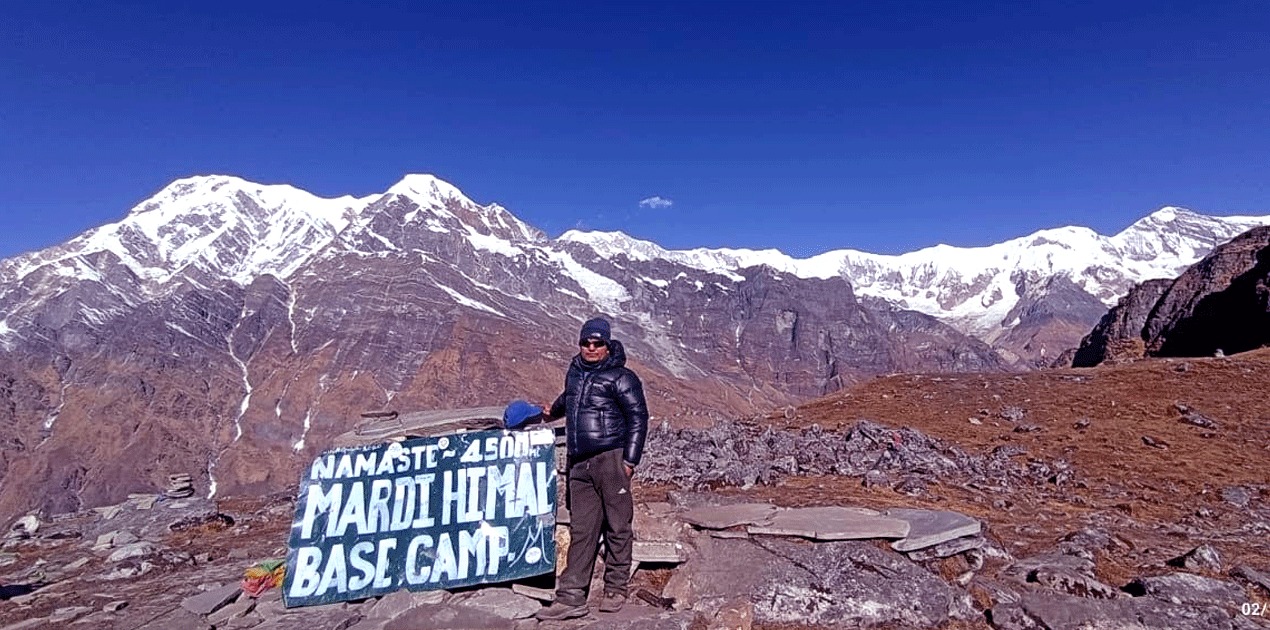
| Maximum Elevation | Mardi Himal High Camp / Viewpoint: approx. 4,500 m (14,764 ft) |
| Trek Distance | Approximately 50–55 km total on foot |
| Difficulty Level | Moderate (suitable for reasonably fit beginners with preparation) |
| Best Season | March to May and October to December |
| Permits Required | TIMS Card and Annapurna Conservation Area Permit (ACAP) |
| Accommodation | Tea houses and basic lodges along the route |
| Starting Altitude | Kathmandu: 1,400 m; Pokhara: 822 m; Kande: 1,770 m |
| Trek Style | Point-to-point (Kande to Siding village) or loop back to Lumre |
When to Go
Nepal’s trekking seasons are shaped by two weather systems that are as reliable as they are dramatic. Getting the timing right is not a minor detail. It is the difference between waking up at High Camp to a sky full of Himalayan giants and waking up to a wall of grey cloud that gives you nothing.
Spring: March to May
This is arguably the finest time to trek to Mardi Himal. The rhododendron forests that cover the lower and middle sections of the ridge are in full bloom through March and April, painting the hillsides in deep reds and soft pinks. The air is clear, temperatures are rising, and the days are long. Visibility tends to be at its best in the early morning. By late May, the pre-monsoon haze begins to build, and afternoon clouds are more frequent, but mornings remain spectacular. Daytime temperatures at High Camp range from roughly 5 to 12 degrees Celsius, while nights dip below freezing.
Autumn: October to December
The monsoon washes the Himalayas clean every year, and October is when you get to see the results. The mountain views in autumn are exceptional, the trails are dry, and the air has a sharpness to it that makes distant peaks look close enough to touch. October and November are the most popular months across all of Nepal’s trekking routes, so while Mardi Himal is still comparatively quiet, you will see slightly more company at the lodges than in spring. December brings colder temperatures, and the trail above Low Camp can carry snow, but the lodges remain open, and the skies are often clear.
Seasons to Avoid
The monsoon runs from June through September and brings heavy, persistent rain. The trail through the forest becomes slippery and leech-ridden, cloud cover blocks the mountains almost entirely, and landslides are a genuine concern on approach roads. January and February see the coldest conditions of the year at altitude, with significant snowfall possible above 3,000 metres. These months are manageable for experienced winter trekkers but are not recommended for those coming to Mardi Himal for the first time.
Permits and Documentation
Nepal has streamlined its permit system in recent years, and getting everything in order before you set off from Pokhara is straightforward as long as you know what you need. There are two permits required for the Mardi Himal trek, and you must carry both with you at all times on the trail because there are checkpoints where they will be inspected.
TIMS Card (Trekkers Information Management System)
The TIMS card is a personal identification document for trekkers that the Nepal Tourism Board uses to track the movement of visitors in the hills. You can obtain it from the Nepal Tourism Board office in Kathmandu (Pradarshani Marg, near the Bhrikutimandap exhibition grounds) or from the Trekking Agencies Association of Nepal office in Pokhara (Damside). The cost is currently 2,000 Nepalese Rupees for individual trekkers and 1,000 Rupees per person for those trekking through a registered agency. Bring two passport-size photographs and a photocopy of your passport.
ACAP Permit (Annapurna Conservation Area Permit)
The Mardi Himal trail falls within the Annapurna Conservation Area, and you need the ACAP permit to enter. It costs 3,000 Nepalese Rupees for foreigners and can be obtained at the same offices as the TIMS card, or at the ACAP checkpoint at Dhampus or Kande on the day you begin your trek. Getting it in advance is much smoother and saves time on your first trekking morning. Again, bring a passport photo and a passport copy.
A useful note: both permits can be obtained in Pokhara on the morning you leave for the trailhead, but arriving early is advisable as the offices can be slow. If you are trekking through an agency, they will typically handle both permits for you as part of the package.
Getting from Kathmandu to Pokhara
Pokhara is the launching pad for the Mardi Himal trek and the first significant journey you will make after arriving in Kathmandu. There are two ways to get there, and both have their merits.
By Flight
The flight from Tribhuvan International Airport in Kathmandu to Pokhara Regional Airport takes between 25 and 30 minutes and is one of the more memorable short flights in the world. On clear days, the entire chain of the Annapurna range fills the window to your left if you are seated on the north-facing side of the plane. Airlines, including Yeti Airlines, Tara Air, Shree Airlines, and Buddha Air, operate multiple daily flights. Tickets cost between USD 80 and 120 one way, depending on the season and how far in advance you book. Book ahead, especially in October and November when flights fill up fast.
By Tourist Bus
The Prithvi Highway connecting Kathmandu to Pokhara is around 204 kilometres long and takes approximately 6 to 8 hours by tourist bus, depending on traffic, road conditions, and the usual delays that come with Nepali mountain roads. Tourist buses depart from the Thamel area in Kathmandu and from the tourist bus park near Lakeside in Pokhara. Tickets cost between 600 and 1,500 Rupees, depending on the level of comfort. The road passes through river gorges and terraced hillsides and is genuinely scenic for much of the journey, though the last couple of hours can be tiring. If you suffer from motion sickness, a flight is strongly recommended.
By Private Vehicle
A hired car or jeep from Kathmandu to Pokhara gives you flexibility, comfort, and the option to stop wherever you like along the way. This is a good option if you are travelling in a group. Expect to pay between USD 80 and 150 for a private one-way journey, depending on the vehicle type and negotiation.
Accommodation on the Trek
The tea house system along the Mardi Himal route is the backbone of the entire experience. These are small family-run lodges that provide a bed and meals at each stopping point along the trail, and their quality varies considerably depending on the altitude and remoteness of the location.
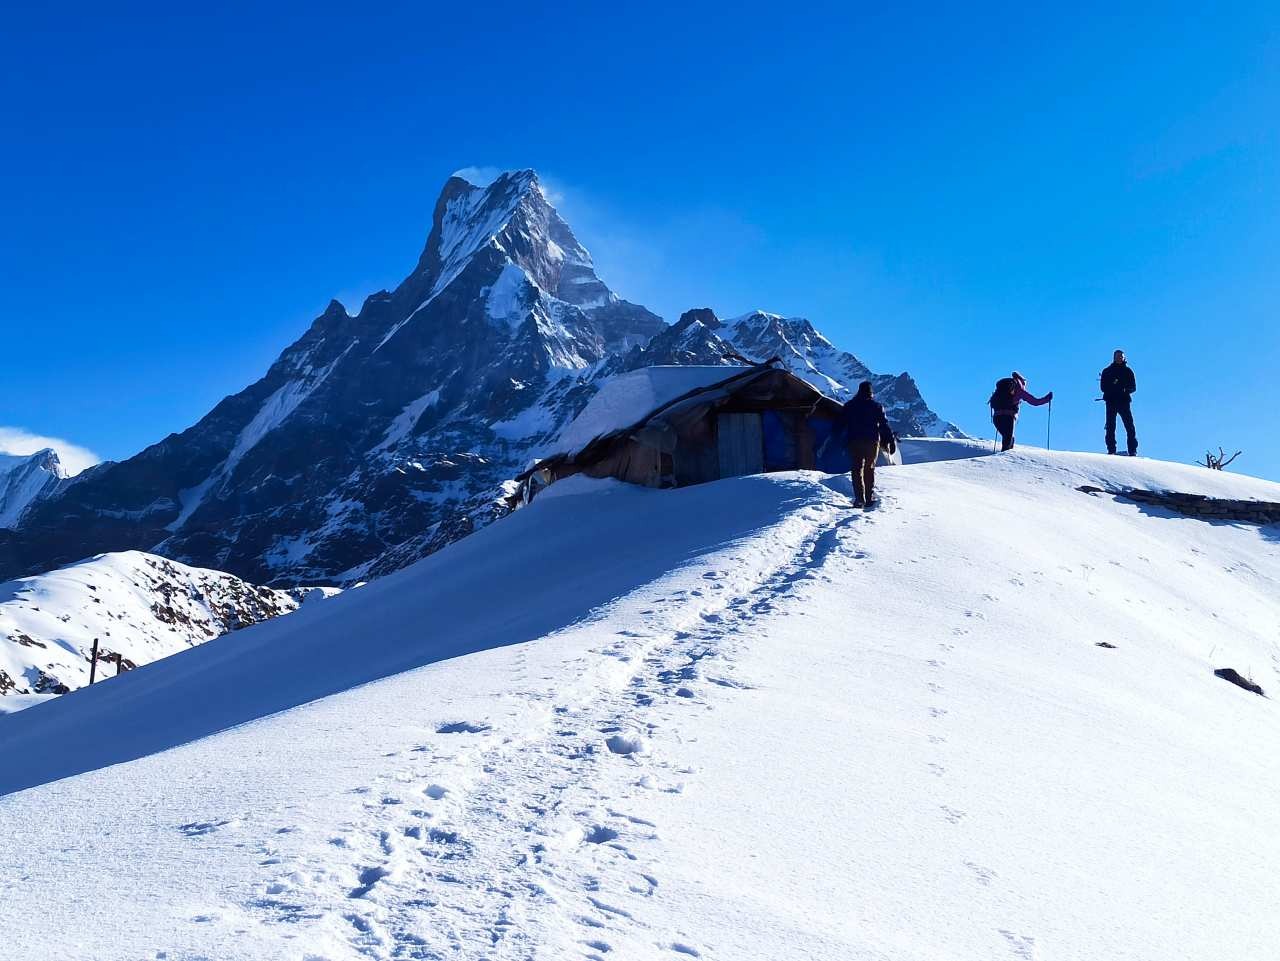
In Kande and Australian Camp, the tea houses are relatively developed with reasonable facilities. Private rooms with a basic bed, blanket, and pillow are standard. At Forest Camp and Low Camp, the lodges are simpler, with dormitory-style accommodation becoming more common and private rooms being smaller and more basic. At High Camp, you are in one of the most basic accommodation settings of the entire trek. The lodges there have been built and rebuilt over the years by remarkably determined people, and they are functional and warm but stripped down to essentials.
Across all tea houses on this route, bring your own sleeping bag. The lodge blankets are available, and the proprietors wash them as regularly as is practical at altitude, but a personal sleeping bag rated to at least negative 10 degrees Celsius gives you warmth, hygiene, and peace of mind. At High Camp, a sleeping bag rated to negative 15 degrees is worth considering during the winter months.
Hot showers are available at the lower elevation lodges and are warm to tepid affairs that cost an additional 200 to 400 Rupees. Above Low Camp, bucket warm water is typically the best available option, and at High Camp, cold water for a quick wash is the reality. This is not hardship. It is the trade for the view.
Charging facilities for phones and cameras exist at all the main lodges and cost between 100 and 300 Rupees per charge. Carry a power bank for the stretches between charging points, particularly above Forest Camp.
Food and Water on the Trek
What to Expect on the Menu
The tea house menu is a document that barely changes from one lodge to the next along any Himalayan trail, and the Mardi Himal route is no exception. Dal bhat is the centrepiece and the meal that veteran trekkers swear by. It is a set plate of steamed rice, lentil soup, vegetable curry, and a small salad or pickle, and in Nepal, the tradition is that it comes with unlimited refills of the dal and vegetables as long as you are still hungry. After a full day on the ridge, you will be very hungry.
Beyond dal bhat, the menus typically include noodle soups, fried rice, vegetable fried noodles, pasta, porridge, pancakes, eggs prepared various ways, and an assortment of Tibetan bread preparations. Tsampa, roasted barley flour mixed with butter tea or water into a thick paste, is the traditional food of the high Himalayan communities and is worth trying if you see it on offer. Momo, the Nepali steamed dumpling, appears on most menus and is excellent when fresh.
A practical note on food and altitude: above 3,500 metres, your appetite will very likely decrease even as your body’s caloric demands increase. Force yourself to eat. A bowl of warm soup and a plate of carbohydrates at the end of a long day at altitude matters more than it would at sea level. Eat what is available and what appeals to you. This is not the moment for dietary restriction.
Water and Hydration
Drinking water is available at every tea house along the route, sold as boiled water or bottled water. Buying bottled water at altitude contributes to the significant plastic waste problem in Nepal’s mountain areas, so carrying a reusable bottle and either purifying boiled water with iodine tablets, using a quality filter, or using a UV steriliser like a SteriPen is strongly recommended. Water sources along the trail are generally clean above the forest, but should always be treated before drinking.
Hydration is not optional at altitude. Aim for three to four litres of water per day, more than you would drink at home. Dehydration and altitude sickness share many symptoms, and one makes the other significantly worse. Keep your water bottle accessible while walking and drink regularly, even when you do not feel thirsty.
Altitude and Health
Understanding Altitude Sickness
Acute Mountain Sickness, commonly called AMS, is the body’s response to reduced oxygen at altitude. It can affect anyone regardless of fitness level, age, or previous experience at high altitude. The condition does not discriminate, and there is no reliable way to predict in advance who will be affected. What is certain is that the risk increases with the speed of ascent and the altitude reached.
The Mardi Himal trek reaches approximately 4,500 metres at the viewpoint, which is well within the altitude range where AMS is possible. The itinerary in this guide has been designed with gradual ascent in mind, allowing the body time to adjust at each elevation before climbing further, but individual responses vary.
Recognising the Symptoms
Mild AMS presents as a headache, typically described as feeling like a tight band around the head, along with fatigue, loss of appetite, nausea, and disturbed sleep. These symptoms appearing on the first night at a new altitude are common and not immediately dangerous. They usually improve with rest and hydration and should resolve within 24 hours without further ascent.
Severe AMS, and the two conditions it can progress to, High Altitude Pulmonary Edema (HAPE, where fluid fills the lungs) and High Altitude Cerebral Edema (HACE, where fluid accumulates in the brain), are medical emergencies. Symptoms to watch for that indicate you need to descend immediately include severe or worsening headache unresponsive to paracetamol, extreme fatigue, confusion or difficulty walking a straight line, persistent vomiting, breathlessness at rest, and a cough that produces pink or frothy mucus. Do not sleep and hope it passes. Descend. This is the only reliable treatment.
Prevention
The most effective way to prevent altitude sickness is to ascend gradually, which this itinerary is designed to support. Additional measures include staying very well hydrated, avoiding alcohol and sleeping pills at altitude, eating regular meals, and sleeping at a lower elevation than your maximum altitude for the day, where this is practical. Some trekkers take acetazolamide, sold under the brand name Diamox, as a prophylactic medication. This requires a prescription and should be discussed with a doctor before departure. It does not prevent AMS entirely, but it can reduce the severity of symptoms. Be aware that it causes increased urination and a tingling sensation in the extremities, both of which are normal side effects.
What to Pack
Footwear and Clothing
Footwear is the single most important investment you will make for this trek. Waterproof, ankle-supporting trekking boots that have been broken in before the trip are essential. Blisters at altitude are miserable and can sideline a trek entirely. Bring at least two pairs of moisture-wicking trekking socks and one pair of camp sandals or lightweight shoes for use at the lodges.
Layering is the strategy for Himalayan clothing. A moisture-wicking base layer keeps you dry while moving. A mid-layer fleece or down jacket provides warmth at rest. A waterproof and windproof outer shell protects against the weather above the treeline. Trekking trousers or convertible trousers work well for the lower and middle sections of the route. Warm sleeping clothes separate from your trekking clothes, because changing out of the clothes you have been sweating in all day before bed significantly improves sleep quality.
Do not underestimate the cold. High Camp at night in October is well below zero degrees. The wind above the treeline during the day can make temperatures feel significantly colder than the ambient air temperature. A warm hat that covers your ears, gloves or mittens, and a neck gaiter or balaclava are not accessories but necessities above 3,500 metres.
Equipment
A pack of between 35 and 45 litres is right for a self-supported trekker. If you are hiring a porter, they will typically carry up to 15 to 20 kilograms, allowing you to walk with a lighter daypack. A sleeping bag rated to at least- 10 degrees Celsius is essential. Trekking poles are highly recommended and make a measurable difference on both the steep ascents and the long descents on this route.
A quality headlamp with spare batteries is non-negotiable. Sunscreen with a minimum SPF of 50 and UV-protective sunglasses are critical at altitude, where UV radiation is significantly more intense than at sea level. A basic first aid kit should include ibuprofen and paracetamol for altitude headaches, blister treatment, an elastic bandage, antiseptic, and any personal prescription medications. A water purification system of your choice, whether filter, UV, or chemical tablets, rounds out the core equipment list.
Practical Tips from People Who Have Done This
Start every morning earlier than you think you need to. Weather in the Himalayas reliably deteriorates through the afternoon as valley thermals push clouds up the ridges. The windows of clear sky are almost always widest between six in the morning and noon, and the summit views that make this trek memorable are seen through those windows.
Tell your tea house what time you want breakfast the night before. Kitchen preparation at altitude takes longer than it does at sea level, and a 5 AM start requires coordination with the cook, who also wants to sleep.
The tea house WiFi ranges from adequate to fictional depending on the location and weather. Budget not to rely on it. A local SIM card from Ncell or Nepal Telecom, purchased in Kathmandu or Pokhara, gives you better connectivity on the lower sections of the trail and serves as a GPS device if you have an offline maps app installed.
Carry cash. The Mardi Himal route has no ATMs above Pokhara. Bring enough Nepalese Rupees from the city for all your lodge payments, guide and porter fees, and any additional expenses. Five hundred and one thousand Rupee notes are most useful. Large denomination notes can be difficult to break in remote locations.
Respect the lodge kitchens. These are working family spaces, and walking behind the counter or into the kitchen without invitation is considered rude. Ask before taking photographs of people, particularly in the villages, and always accept the refusal gracefully.
Learn a handful of Nepali words. Namaste for greeting. Dhanyabad for thank you. Bistari bistari means slowly slowly, which is both useful advice and a phrase that sums up the entire philosophy of Himalayan trekking rather well. The effort of attempting the language, however imperfectly, is met with warmth that makes the interactions on the trail genuinely memorable.
Trekking Responsibly in the Annapurna Region
The Annapurna Conservation Area is one of the most biodiverse protected regions in Asia, home to snow leopards, red pandas, Himalayan tahr, musk deer, and hundreds of bird species, as well as several traditional hill communities whose way of life has been shaped by these mountains over centuries. Tourism that funds the trail system and the local lodges, also, if managed carelessly, threatens the very things that make the region extraordinary.
Carry all your non-biodegradable waste back down with you. Plastic bottles, packaging, batteries, and anything you carried up should come back down. Burn nothing that will not cleanly combust, and put nothing in the water sources. Use the lodge toilet facilities rather than the trail. These are elementary principles, but they make a material difference in a high-altitude environment where decomposition rates are extremely slow.
Paying the fair rate for guides and porters matters. The wages of the people who carry loads, cook meals, and navigate these trails support entire families and communities. Bargaining aggressively on guide and porter fees for the sake of saving twenty dollars is a poor trade in both practical and human terms. The Trekking Agencies Association of Nepal sets the official minimum porter wage and should be the floor, not the ceiling, of what you pay.
Buy locally where you can. The tea house system exists in part because trekkers spend their money in the mountain communities they pass through. This is one of the more direct and effective forms of tourism benefit available. Choosing locally made snacks, local tea, and locally produced goods over imported items matters more than it might seem.
 |
 |
- Scenic ridge trek in the stunning Annapurna Conservation Area
- Breathtaking sunrise views over Annapurna South, Machhapuchhre, and Dhaulagiri
- Less crowded alternative to popular Annapurna treks
- Walk through beautiful rhododendron and oak forests
- Reach Mardi Himal Viewpoint (4,500 m) for panoramic Himalayan views
- Experience authentic Gurung culture in Siding village
- Comfortable tea house accommodation throughout the trek
- Short and accessible trek starting from Pokhara
- Ideal for beginners with a good fitness level
- Perfect mix of nature, culture, and adventure
Itinerary of Mardi Himal Trek
Day 1: Arrive in Kathmandu and Settle In
Day 2: Kathmandu to Pokhara, then to Kande
Day 3: Kande to Australian Camp to Forest Camp
Day 4: Forest Camp to Low Camp
Day 5: Low Camp to High Camp
Day 6: High Camp to Mardi Himal Viewpoint and Back
Day 7: High Camp to Siding Village
Day 8: Siding to Pokhara
Day 9: Rest and Explore Pokhara
Day 10: Pokhara to Kathmandu and Departure
Includes/Excludes
What's included?
A standard guided Mardi Himal trek package covers the essentials that get you from Pokhara to the ridge and back safely and comfortably. Here is what you can expect to be part of the arrangement without any additional charge.
Permits and Documentation
Both the TIMS card and the Annapurna Conservation Area Permit are included in the standard package price. These are the two documents that allow you legal entry to the trekking route and the protected conservation area.
Your agency handles the application process, which saves you a trip to the permit offices in Pokhara on the morning you want to head to the trailhead. The permits will be in your hands before you take your first step.
Airport and Trailhead Transfers
Pickup from Pokhara airport or the Pokhara tourist bus park is included, along with the drive to the trailhead at Kande or Lumre, depending on the route variation your agency uses. Return transport from Siding village back to Pokhara at the end of the trek is also covered.
If you are arriving in Nepal from Kathmandu, the Kathmandu to Pokhara leg of travel is sometimes included in higher-tier packages but is more commonly an additional arrangement. Clarify this with your agency when booking.
Professional Guide for the Full Duration
An experienced, government-licensed trekking guide is included for the entire duration of the trek from the first day on the trail to the last.
This is not a guide who walks ahead and points at things. A good Mardi Himal guide knows which sections of the ridge above Low Camp are genuinely tricky in mist, knows the lodge owners personally and can navigate the occasional shortage of beds or food, reads the altitude responses of the people in their group and adjusts the pace accordingly, and speaks enough English to communicate everything from trail conditions to altitude sickness symptoms clearly and without alarm.
The cost of the guide’s accommodation and meals on the trek is covered by the package. Tipping is customary and meaningful, but entirely at your discretion.
Porter Service
Most standard packages include one porter per two trekkers, which means your main bag is carried for you while you walk with a lighter daypack. The porter carries up to approximately 20 kilograms of combined luggage.
Their accommodation, meals, and insurance on the trek are covered. Porter welfare is something that ethical agencies take seriously, and the better agencies in Nepal are certified by organisations like the International Porter Protection Group.
Ask your agency about this before you book, and take it as a signal of the kind of operation they run.
Tea House Accommodation
All accommodation in tea houses along the trekking route is included. This covers twin-sharing rooms at each stopping point from Kande through to Siding.
The rooms are clean and basic. Bedding is typically provided by the lodge, though bringing your own sleeping bag is strongly recommended for warmth and hygiene reasons. The accommodation cost at every lodge on the route is settled by the agency as part of the package.
Meals on the Trek
Three meals per day throughout the trekking days are included: breakfast, lunch, and dinner.
Meals are provided at the tea houses along the route. The menus are what you would expect from a Himalayan trail, including dal bhat, noodle soups, fried rice, omelettes, porridge, and variations on these themes, prepared fresh at each lodge.
The food is simple, substantial, and exactly what you need at altitude. Meals in Pokhara before and after the trek are not included in most packages.
First Aid and Emergency Equipment
Your guide carries a standard first aid kit appropriate for high-altitude trekking conditions. This includes treatment for blisters, cuts, minor injuries, and medication for headache management.
A pulse oximeter for monitoring blood oxygen saturation levels is also carried by your guide, which is one of the most useful early indicators of altitude-related problems. Verify this is the case when you meet them before the trek begins.
Government Taxes and Service Charges
All applicable government taxes and service charges related to the trek package are included. Nepal has a value-added tax and tourism service charge that applies to most organised trekking services, and these are absorbed into the package price rather than added at the end.
| Category | What’s Included |
|---|---|
| TIMS Card | Arranged in advance by the agency |
| Annapurna Conservation Area Permit (ACAP) | Fully included |
| Airport / Bus Park Transfers | Pickup in Pokhara |
| Return Transport | Drop-off from Siding village to Pokhara |
| Licensed Guide | Full trek duration covered |
| Porter Service | 1 porter per 2 trekkers (up to ~20 kg luggage) |
| Tea House Accommodation | Twin-sharing rooms throughout the trek |
| Meals on Trek | Breakfast, lunch, and dinner daily |
| First Aid Kit | Carried by a guide for basic treatment |
| Pulse Oximeter | Oxygen level monitoring during trek |
| Government Taxes & Charges | All applicable fees are included in the package |
What's not included?
Knowing what is outside the package is just as important as knowing what is inside it, and this section deserves as much attention. These are the costs you need to budget for separately and arrange before you leave for the trailhead.
International Flights and Nepal Visa
Your flights to and from Nepal are entirely your own arrangement. The Nepal tourist visa, obtained on arrival at Tribhuvan International Airport or at Nepali embassies and consulates beforehand, costs USD 30 for a 15-day single entry, USD 50 for a 30-day multiple entry, and USD 125 for a 90-day multiple entry. Bring two passport photographs and the fee in US dollars or an equivalent currency at the arrival desk. The visa is not handled or covered by your trekking agency.
Travel and Medical Insurance
This is not an optional line item. It is the single most important thing to arrange before travelling to Nepal for a trek. Your insurance must specifically cover high-altitude trekking and, critically, helicopter evacuation. A helicopter rescue from the Mardi Himal ridge to Pokhara costs between USD 2,000 and 5,000. Without insurance, that cost falls entirely on you or, in worse circumstances, on whoever you have listed as an emergency contact. Policies from providers like World Nomads, Battleface, or IMG Global are popular among Himalayan trekkers. Read the altitude coverage limits carefully before purchasing and make sure the maximum covered altitude exceeds 4,500 metres.
Kathmandu to Pokhara Travel
Unless your agency specifically includes this in a Kathmandu departure package, the cost and arrangement of getting yourself from Kathmandu to Pokhara is your own responsibility. This means either booking a domestic flight with Yeti Airlines, Buddha Air, or another carrier at between USD 80 and 120, or arranging a tourist bus ticket at between 600 and 1,500 Rupees. Both the Nepal Airlines office near Durbar Marg and the major online booking platforms handle these reservations. Book ahead in peak season.
Personal Trekking Gear and Equipment
Your boots, your sleeping bag, your trekking poles, your clothing layers, your headlamp, your sunscreen, and every other piece of personal gear are your own responsibility. Kathmandu and Pokhara both have excellent gear markets where you can purchase or rent items. For a trek of this length, buying quality gear rather than renting is generally the better investment. The one exception is down jackets, which can be rented at reasonable daily rates if you do not want to add the bulk and cost to your luggage.
Drinks Beyond Water
Soft drinks, bottled or canned juices, coffee, tea, hot chocolate, and alcoholic beverages at the tea houses are not included in the package and are added to your personal bill at each lodge. At altitude, hot lemon with honey and ginger tea are the drinks most worth spending your money on. Alcohol at altitude impairs the body’s acclimatisation process, dehydrates you faster than it does at sea level, and makes an already challenging physiological situation more difficult. Most experienced guides recommend avoiding it above 3,000 metres entirely.
Hot Showers and Phone Charging
Hot showers at the lower elevation lodges are charged separately, typically between 200 and 400 Rupees per shower. Above Low Camp, hot shower options diminish considerably, and warm bucket water becomes the standard. Phone and camera charging at the lodge’s power sockets costs between 100 and 300 Rupees per device per charge. These are small costs individually, but they add up across the length of the trek. Budget around 1,500 to 2,500 Rupees in total for these personal services.
Tips for Guide andPorter
Tipping is not included in the package price and is not mandatory, but it is the norm on Himalayan treks and is one of the more meaningful ways your money reaches the people who made the trip possible. The standard recommendation from the Trekking Agencies Association of Nepal is approximately USD 8 to 12 per trekker per day for a guide and USD 4 to 6 per trekker per day for a porter. A tip presented personally at the end of the trek, in an envelope with a short note if you have the energy for it, is remembered and appreciated.
Personal Travel Expenses
Anything you spend in Kathmandu or Pokhara outside of the trek package is entirely personal, including accommodation before and after the trek, meals in the city, sightseeing entry fees, souvenirs, massage, laundry, transport within the city, and any additional activities. Pokhara’s Lakeside area has accommodation options from 800 to 5,000 Rupees per night, depending on the level of comfort you are looking for. Budget meals in Lakeside cost between 400 and 800 Rupees. Nicer restaurant meals run from 1,000 to 2,500 Rupees.
Medical Expenses and Evacuation Costs
Any medical treatment required during or after the trek, whether at a local health post, a hospital in Pokhara, or through emergency evacuation, is your own financial responsibility. This is why the insurance point above matters so much. The CIWEC Travel Medicine Center in Kathmandu and the Western Regional Hospital in Pokhara both have experience treating altitude-related conditions, but their services come at a cost that, without insurance, can be substantial.
At a Glance: Not Included
| Category | Details |
|---|---|
| International Flights | Travel to/from Nepal is not included |
| Nepal Visa | USD 30–125, payable on arrival |
| Travel Insurance | Must include high-altitude + helicopter evacuation |
| Kathmandu–Pokhara Travel | Flight or bus, booked separately |
| Personal Gear | Clothing, boots, sleeping bag, poles, etc. |
| Beverages | Tea, coffee, soft drinks, and alcohol are excluded |
| Hot Showers | NPR 200–400 per use |
| Device Charging | NPR 100–300 per charge |
| Guide & Porter Tips | Customary but not included |
| Personal Expenses | Hotels, food, shopping, sightseeing |
| Medical & Evacuation | Covered by personal insurance only |
Trip Information - Good to Know
Trip Overview
- Destination: Nepal
- Region: Annapurna
- Duration: 10 Days
- Trek Duration: 6 Days
- Max Altitude: 4,500 m (Mardi Himal Viewpoint)
- Difficulty: Moderate
Best Time to Visit
- Spring (Mar–May): Rhododendron blooms & clear views
- Autumn (Oct–Dec): Best visibility & stable weather
Permits Required
- TIMS Card
- Annapurna Conservation Area Permit (ACAP)
Transportation
- Kathmandu to Pokhara by flight (25 min) or tourist bus (6–8 hrs)
- Drive to Kande (trek starting point)
Accommodation
- Tea houses / lodges during the trek
- Hotel in Kathmandu & Pokhara
Meals
- Breakfast, Lunch, Dinner during trek
- Nepali & basic international dishes available
Drinking Water
- Available at tea houses (boiled or bottled)
- Water purification recommended
Trek Style
- Point-to-point (Kande → Siding village)
Altitude Consideration
- Risk of altitude sickness above 3,000 m
- Proper acclimatization required
Additional Costs
- Personal expenses
- Hot showers, charging, WiFi
- Tips for guide & porter
Frequently Asked Questions
Do I need prior trekking experience?
No prior trekking experience is required for the Mardi Himal trek. However, you should be reasonably fit and comfortable walking 5–6 hours a day on uneven mountain trails. The main challenge is altitude rather than technical difficulty. A steady pace and proper acclimatisation are more important than experience.
How fit do I need to be?
You should be fit enough to walk for 6–7 hours a day on uneven terrain with both uphill and downhill sections. Good cardiovascular endurance and leg strength will make the trek much more comfortable. Training with walking, hiking, or cycling before the trip is highly recommended. Knee strength is especially important for long descents.
Is Mardi Himal safe without a guide?
The trek can be done independently, especially in the lower sections where the trail is clear and well-marked. However, above Forest Camp, the route becomes less distinct and can be confusing in poor weather conditions. A guide adds safety through navigation, altitude monitoring, and emergency decision-making. For most trekkers, a guide significantly reduces risk and stress.
What is the highest altitude?
The highest point of the trek is the Mardi Himal viewpoint at around 4,500 metres above sea level. High Camp, where most trekkers spend the night, is located at approximately 4,200 metres. Some routes may reach slightly higher near Base Camp at around 4,500–4,600 metres. The actual summit of Mardi Himal is 5,587 metres and is not part of the trekking route.
What if I get altitude sickness?
Mild altitude sickness is common and can include headache, fatigue, or nausea. These symptoms often improve with rest, hydration, and slow movement. However, the only effective treatment for serious altitude sickness is immediate descent to a lower altitude. Your guide will monitor your condition and decide the safest action if symptoms worsen.
Is the trek suitable for older people?
Yes, the Mardi Himal trek is suitable for older trekkers who are healthy and physically active. Many people in their 50s, 60s, and beyond complete it successfully. Fitness level and medical condition matter more than age itself. A pre-travel health check is strongly recommended for anyone with existing conditions.
How cold does it get?
Temperatures at High Camp can drop to between -5°C and -15°C depending on the season. Nights are the coldest, especially in autumn and winter months. Daytime temperatures are milder but still cool at higher elevations. Proper layering and a warm sleeping bag are essential for comfort and safety.
Can I do the trek independently?
Yes, independent trekking is legally allowed on the Mardi Himal route. However, you must arrange permits, navigation, accommodation, and logistics on your own. While experienced trekkers manage this, most people prefer going with a guide for safety and convenience. A guide also helps with altitude monitoring and local support.
What food is available?
Tea houses along the route serve simple but filling meals suitable for trekking. Common options include dal bhat, noodles, fried rice, soups, eggs, pancakes, and porridge. The food is fresh but repetitive, especially at higher altitudes where supplies are limited. Vegetarian options are widely available throughout the trek.
Is there WiFi or mobile network?
Mobile network and WiFi are available only in the lower sections, such as Kande and Australian Camp. Beyond Forest Camp, connectivity becomes weak or completely unavailable, especially at High Camp. Coverage is unreliable due to terrain and altitude. It is best to download maps and essential information before starting the trek.
Is there ATM access?
There are no ATMs anywhere on the Mardi Himal trekking route. You must withdraw all required cash in Pokhara before starting the trek. Most expenses on the trail are cash-based, including food, drinks, and services. Carrying extra cash is recommended to avoid shortages.
What currency should I bring?
You should carry Nepalese Rupees (NPR) because it is the only currency accepted on the trail. Foreign currencies are not usable in tea houses or small villages along the route. Cash is needed for food, drinks, charging, and other personal expenses. It is best to withdraw everything in Pokhara before departure.
What if weather is bad at the viewpoint?
Weather in the Himalayas can change quickly and may block views or make the ascent unsafe. In such cases, your guide may delay the climb or cancel it for safety reasons. Even without reaching the viewpoint, the trek experience remains rewarding due to the ridge scenery. Safety always takes priority over reaching the summit point.
Is the trek suitable for children?
Yes, fit and active children can manage the lower parts of the trek comfortably. However, high-altitude sections above 4,000 metres are not recommended for younger children due to altitude sickness risks. Families should remain flexible and prepared to turn back if needed. Safety and health should always come before completing the full route.
How do I book the trek?
You can book the trek through a licensed trekking agency such as Green Horizon, which is the most convenient option with everything arranged for you. Alternatively, you can hire a guide and porter locally in Pokhara or trek independently if you are experienced. Always ensure your guide is licensed and your agency is registered with the Nepal Tourism Board. Proper verification ensures safety and reliability on the trek.
Trip Reviews
- Best Price Guarantee
- Secure & easy booking
- Easy trip date changes
- Discount for groups


How to book a trip?

make free inquiry

confirm the trip